git gud: A guide to rewriting history
At the beginning of my career, I didn’t really care much about git. It was just a tool to save my code and collaborate with others, and any command which allowed me to do so was good enough. I found a lot of the git-commands to be opaque, and struggled with any issue outside of my usual workflow:

The thing that made git click for me was when I finally started to look beyond the docs and explanation of commands, at how git actually works under the hood. The data model is relatively simple, and once I had a grasp of it, a lot of commands immediately started to make sense.
Furthermore, the more experience I gathered as a developer, the more it was clear to me that some basic git hygiene can go a long way, especially in bigger projects with many contributors (such as monorepositories at my work). I have become more and more fond of linear history approaches, which is very easy to enforce and makes it incredibly easy to reason about incremental changes to the codebase (see also below).
About this guide
I’ve initially written this guide in similar form for work-purposes (this might shine through here and there), to enable developers to work on a project that enforces linear history.
This guide is meant for people who are familiar with basic commands such as git checkout/commit/push/pull/merge/add,
but are generally not using any commands that rewrite history. If you’re familiar with commands such as
git rebase, git reset or git merge --squash, this guide offers maybe no new insights for you, but could
maybe serve as a cheat-sheet for various git-commands.
Note: There is a “Troubleshooting”-section at the bottom, if you’re looking for a specific solution to a problem, have a look there!
What is a linear history and why should I care?
A linear history is essentially a history where every commit is limited to having exactly one parent - or in other words, the history does not contain merge-commits.
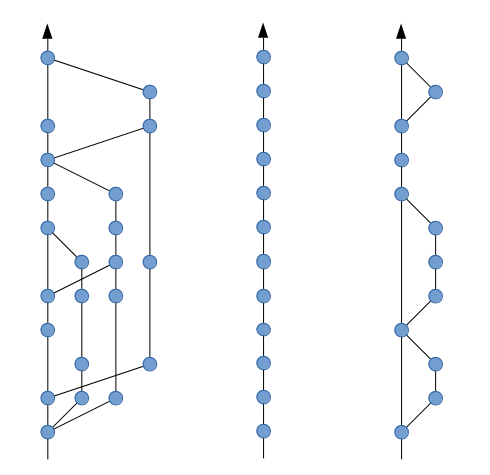
Different git-histories: Non-linear, linear and ‘semi-linear’ (gitlab terminology). Image from bitsnbites.eu
The advantages should be self-evident: It is easier to read, it establishes an obvious order in which
changes are applied, it is easier to see which commits introduced e.g. a broken build, it allows for more
advanced tool-support (easier to e.g. use git bisect, better possibilities for incremental builds, etc.).
The advantages however come at a price: One cannot create merge-commits, which are usually the easiest way to “update” a branch, especially when conflicts are involved.
In other words - in a non-linear history, “insertion” is easy, but “find, analyze, understand” is hard. In a linear history, it’s exactly the other way around: “insertion” becomes harder - but everything else becomes significantly easier.
I’m afraid to touch git stuff, I might break things!
Don’t worry! It’s essentially impossible (well, not quite, but almost) to break your local git repository. You really have to put some effort into doing so. However, to get you started, it is recommended to follow this simple checklist here:
- Do not use any of the following commands/instructions if you have uncommitted changes in your repository that you might want to keep for later
- Do not rewrite history of branches that other people also work on. And if you do, make sure that everyone is aware and approves.
Some basic concepts
There is this common misconception that a branch is a chain of commits of sorts, a collection of diffs,
something that is bound to the changes you’re working on. All wrong! A branch is literally a file containing
the id (hash) of some commit. Or in other words, a pointer. If you need prove, just head over to the .git/refs/heads-folder
at the root of a repository (hidden in many IDEs by default, as you never want to touch this one),
you should see a file for every single local branch, and all files just contain a single commit-id. That’s it!
Now, what does this mean and why should we care?
Pointers are something that can be moved easily - we just have to point it to something else. And this is what we will do with our first command.
Commands
git reset: Change pointers
We now know that a branch is just a pointer, so let’s move that pointer. This is where git reset comes into play.
There are two basic options (among many others, but these two are the important ones): git reset --soft, and git reset --hard.
git reset --soft <commit-ish>: Will set the current branch to the given ‘commit-ish’ (a commitId or something that resolves to a commitId), without changing any files. In other words,git reset --softonly changes that one single file in the.git/refs/heads-folder, and does nothing else (…sort of). You can try this out by manually changing the commit-id inside such a branch-file - you’ll see, it works!git reset --hard <commit-ish>: Same as before - but the files get changed as well. To stick with the branch-file-analogy; it is the same as if you manually change the commit-id in the branch-file, then rungit status, and then revert every single change untilgit statusreports that there is nothing to commit. This is the manual version of agit reset --hard.
Now let’s get our hands dirty: Imagine you’re on some random branch, committing away some changes you’ve made
for some story. You run git reset --hard HEAD~1, because this seems like a good idea. But oh noes!
Now everything from your last commit is gone. Or has it?
What happened is this: Your branch points to one commit ’earlier’ from where it was before, and all files in your repo are in the state at which that specific commit was created. But what happened to your ’newest’ commit?
git reflog: To the rescue
Git keeps history of your changes - but who keeps history of your history? This is where git reflog comes
into play. If you invoke just git reflog, you will see a log of all commits that were ever at the “tip” (HEAD)
of your repository. It also keeps track of which ‘branch’ you are currently on. You can also narrow this
to e.g. a specific branch: git reflog my-branch will show you all commits to which my-branch has ever pointed.
To solve e.g. a little accident with git reset --hard as described above, we can use git reflog, copy the
commitId we want to go back to, and just use yet another git reset --hard with it.
One note: If there is no branch, tag, or anything else pointing towards a commit, eventually git will assume that it is “dead” and will garbage-collect it. Unless you configure the garbage collection to be more aggressive or invoke it manually, it is very unlikely that you ever lose a commit to garbage collection. But git will clean up for you, so you can create new commits at your heart’s content and don’t need to worry that your repository will clutter with “dead” commits.
git cherry-pick: Create new history… and rewrite it too?
git cherry-pick will be our first command that actually creates a new commit. So far, we’ve just moved pointers forth
and back using reset, and kept track of it using reflog. git cherry-pick <commitId> takes the changeset
of the provided commit and tries to apply it on top of your HEAD. You can also provide multiple commitIds,
it will just apply one after another from left to right. If there is a conflict, git will halt the cherry-picking-process,
allowing you to resolve the conflicts - when done, git resumes after invoking git cherry-pick --continue.
If, for whatever reason, the cherry-pick would result in an empty commit, git will also halt and allow you
to either use git cherry-pick --continue --allow-empty or to use git cherry-pick --skip.
This is all nice and creates ’new history’, but what we really want is to ‘rewrite’ history and relinearize it, no?
We can do that with cherry-pick! Imagine you’re on a branch, say my-branch, you branched off of main.
Now someone else pushes something towards main, and you’re not “up-to-date” anymore. What you would like to
do is have your commits on top of these other changes. In order to achieve that, we can use git reset --hard main
to set the current branch to the same as main. Now your commits on the feature-branch are gone, and your branch is
practically identical with main! But as we’ve learned before, we can use git reflog to see our previous
commits, and we can then use git cherry-pick to apply them on top of our completely fresh, up-to-date my-branch.
However, this seems a bit awkward: Fiddling with reflog, copy-pasting commitIds… that’s cumbersome! We want
something more productive - let’s enter git rebase!
git rebase: Rewrite history, faster!
git rebase, at its core, is essentially a bunch of cherry-picks without having to reset manually.
This picture hopefully explains the concept:
Rebase visualized (credit: atlassian)
The picture makes it seem as if everything happens in one go - but it’s important to understand that these things happen one after another. This will help us understand what’s going on if things go wrong. To break it down, what happens is the equivalent of the following:
git reset --hard main: We’re currently, as per picture, on branchfeature/JIRA-123, which is behind main. With reset, we set them on par.git cherry-pick <green-commit-1> <green-commit-2>": Create two new commits, one after another, with the same change-set as “green-commit-1”/“green-commit-2”.
And voilà, our branch is up-to-date with main again, and still contains our new changes!
Obviously, there might be conflicts - if this is the case, git will stop the rebase-process just as it did
for cherry-picking. You can use git rebase --continue to continue once you resolved the conflicts.
git rebase -i: Rewrite history with style!
The -i stands for interactive - and opens up a whole new world of possibilities. This allows us a myriad
of way of “touching” commits:
- Edit: You realize that e.g. three commits ago, you committed something you really want to get
out of your commit-history (e.g.: accidentally committed a password)? No worries,
git rebase -igot you covered! - Squash/fixup: Create a single commit out of multiple commits
- Drop: Throw a single commit out, entirely
To continue the example from the picture above, if we execute git rebase -i main, an editor will open
that gives us an overview of all commits that will be rebased. In our case, this might look something like this:
pick <green-commit-1> This was the first green commit
pick <green-commit-2> This was the second one
Now if we continue as-is, this will be just a normal rebase: First reset, then cherry-picking one commit after another. However, since we’re in interactive mode, we can change this - your editor should show you some options:
# Commands:
# p, pick <commit> = use commit
# r, reword <commit> = use commit, but edit the commit message
# e, edit <commit> = use commit, but stop for amending
# s, squash <commit> = use commit, but meld into previous commit
# f, fixup <commit> = like "squash", but discard this commit's log message
# d, drop <commit> = remove commit
For brevity, I omitted some. So what you can do is something like this:
pick <green-commit-1> This was the first green commit
squash <green-commit-2> This was the second one
This will result in a new “squash”-commit which essentially contains the change-sets of the two commits combined. Squash will result in having a special commit-message, essentially a concatenation of the two previous commit-messages. The other commands should be hopefully somewhat self-explanatory - if not, just try them out! As you know, you can always “go back” using the strategies mentioned above.
rebase --onto: Even more control!
This parameter gives us more control over what exactly we want to rebase. With git rebase main,
git “picked” every commit that was not yet on main. But what if, for example, you started to work on
something, believing it to be for main, but then your manager tells you all of a sudden that this thing got
priority and needs to go directly to some release-branch?
Running git rebase release directly is not an option, because it would pick every commit in main that is
not yet in release and rebase them on top of release. Disaster! What you want is to tell git that it should pick every commit that is not yet
on main, but then rebase them on top of release instead - and this is precisely what --onto is for:
git rebase --onto release main your_feature_branch
If you break the command down to its “components”, it’s essentially exactly the same process: First, we “reset”,
then, we “cherry-pick” - the only difference that --onto makes here is that it allows us better to define
which commits need to be picked.
git push: Changing the history books requires some force!
Now you hopefully know the basics on how to rewrite git history. You apply these fancy commands on one of your feature-branches, and want to push the rewritten version to the remote. But not so fast!
! [rejected]        my-branch -> my-branch (non-fast-forward)
error: failed to push some refs to 'ssh://...'
hint: Updates were rejected because the tip of your current branch is behind
hint: its remote counterpart. Integrate the remote changes (e.g.
hint: 'git pull ...') before pushing again.
hint: See the 'Note about fast-forwards' in 'git push --help' for details.
Frankly speaking, this hint is misleading. Do NOT use git pull!
But first of all, why does the remote reject our changes? If you run git status, it will tell you
that the remote is X commits ahead and Y commits behind. Since you “created” new commits with rebase,
there is now a difference between your local branch and your upstream tracked version: The remote has still
all the old commits, while your local branch does not have the old commits anymore, but new commits that were
either rebased, squashed or in some other fashion rewritten. With git push, you cannot “destroy” or “override”
such commits - you need to specifically tell git that you want to do that. And this is done by using either:
git push --force-with-lease: The “safer”--force-version: It only overwrites the remote if you were aware of its complete current state. Meaning, that the remote branch did not change since you last fetched its state.git push --force: The same, but without a check. Only use if you’re working on your own personal branch that nobody else is supposed to touch anyway.
A scenario where the use of git --force (instead of --force-with-lease) might be fatal could go as follows: You are about
to force-push a change, but seconds before doing so, someone else also updates the remote branch. In that case,
your force-push would completely override the remote branch, even though you’re not aware of the new changes yet.
--force-with-lease would save you in that regard (this should arguably be the default - it’s probably not for historic reasons).
Writing history: Some best practices & guidelines
Now that we know how to not just write history but also rewrite it, a few words on what we actually could (and possibly should) do with this.
What makes a good commit?
If you for example see a commit history such as follows:
// What are these commits good for?
commit-4  "Fix test"
commit-3  "Fix linting"
commit-2  "Fix build"
commit-1  "[FEATURE-123] Add some fancy functionality for this and that purpose"
Is there ever the possibility that someone, either you or someone else in the future, is interested in checking out “commit-1” directly? Not really, right, because it’s broken - you’d much rather check out the fixed version of it, right?
Therefore, one might argue that these commits should not exist in this form to begin with - they clutter history, do not add any value in and by themselves, they are “just noise”. So if you end up with a branch like this, before merging, it might make sense to use the interactive rebase we’ve learned about above:
git rebase -i <target-branch>

// In the editor:
pick    commit-1  "[FEATURE-123] Add some fancy functionality for this and that purpose"
fixup   commit-2  "Fix build"
fixup   commit-3  "Fix linting"
fixup   commit-4  "Fix test"
Or squash, if you want to keep information about the original commits in the resulting commit-message.
That being said, when doing these “fix”-commits, it might make sense to not create separate commits for them at all:
You can use the git commit --amend-option to just “modify” (meaning: create a new commit) the current commit
and add the fixes to it.
Be careful with git pull
git pull is a “convenience”-command that is essentially just a mix of git fetch and git merge - the latter
means that it will always create a merge-commit if the branch cannot be fast-forwarded. Hence, it is inherently
a command that does not play nice when you want to keep your history linear. You can provide the --rebase option
which makes git pull essentially a combination of git fetch and git rebase, but you might as well invoke rebase yourself.
However, for example on a branch like main where you never commit directly yourself and just want to update your branch,
git pull is perfectly fine. If we’re on a different branch than main and want to update the local branch main
either way, we can use git fetch origin main:main.
UI tools
This guide mostly explained terminal-based git-usage, but some people prefer UI-based tools - the heresy! ;) Most modern IDEs offer some form of integrated git-support, with varying amount of features. Especially support for interactive rebase, probably one of the more helpful tools for linearization of history, is often lacklustre.
- GitKraken: Tries to mimic the text-editor-based approach to interactive rebase as much as possible, but without having to fiddle with vim or some other terminal-based editor. See here for demo and tutorials.
- Source Tree (Atlassian): Supports interactive rebase, but tries to abstract a bit more (see here for details), leaving almost no trace of how one traditionally interacts with git for an interactive rebase.
A collection of links:
- Official git docs: Explain the commands and all their options very extensively - but often also in a very verbose way
- “Advanced Git Tutorials” by Atlassian: Gives a good overview, with nice graphics. Also has a very solid section about garbage collection in git.
- “Commits are snapshots, not diffs” (github blog): Goes into the depths of git, explaining how it works under the hood. A very solid entrypoint for everyone who wants to know the details - and for those who feel that knowing at least some of the inner workings might help to improve their understanding of everyday commands.
- “Things I wish everyone knew about Git”: Approaches Git from the inside-out, starting with this Quote: ““I don’t need to know how it works. I just want to know which commands to run.” - with Git, this does not work.”, which is the same philosophy that this guide here tries to follow.
- Git snippets on “30secondsofcode.org”: Addresses git in small, digestible snippets, can serve as a cheatsheet.
- “Understanding Git Conceptually”: A pretty solid overview over commands and what they do
- “Git from the Inside Out”: Deep-dive, including how to manually create a commit if you are so inclined.
- “Picturing Git: Conceptions and Misconceptions”: In-depth guide into git, quite thorough but still practical.
- “Git purr: Git Explained with Cats”: Git merge and rebase explained with cats, because why not?
- “ugit: DIY Git in Python”: Code-along in python, recreate a mini-version of git from scratch.
- “ohmygit”: Game to explore git and see the effects of commands on the internal structure.
Some extra perls:
- Linus Torvalds on “tracking renames”: For those who are unaware - git is only able to heuristically say whether a file has been renamed/moved or deleted/created. You see this sometimes in pull requests, where people clearly moved stuff, but the diff still marks the original version as “deleted” and the other as “created” from scratch. Linus goes into some of the whys here, in his usual infamous way.
Troubleshooting
My manager decided that some change needs to be prioritized, so it has to go to some
hotfix-branch rather thanmain. What needs to be done?Check out the “rebase –onto”-section.
I used
git pushbut git complains and rejects itSee
git push-section: Most likely, you need to usegit push --force-with-lease. Do not use this on “shared” branches such asdevelop,main,release-...,hotfix-...etc.!I want to change a commit message
If the commit in question is your current HEAD (latest commit), just run
git commit --amend(make sure you have no staged changes, usinggit status. This will allow you to change the message.If the commit is further down in the history, use
git rebase -i <parent-of-commit-to-be-changed>, then use thereword-option. See alsogit rebase -i-section.I do not care about git-history in any way. Just give me some commands to satisfy linear history and make everyone happy!
To keep life really simple, one commit per pull request is the easiest and surest way to keep history linear. To get rid of any issues, we can do the following “manual squash” (assuming you’re targeting
mainwith your PR):git merge origin/main // Bring your branch up-to-date one last time. Doesn't matter if it's a merge-commit. git reset --soft origin/main // See "reset"-section for details. Your HEAD will point to main, but no file is changed. git status // Check your current uncommited changes. They should be just your intended changeset // compared to main. Use your IDE/tool of preference for that. git commit -m "..." // Once you're happy, just "recommit" everything. git push --force-with-lease // See "push"-section on why "--force-with-lease" is required. // DO NOT USE PULL! (see pull-section on why). // Double-check the diff- and commit-section of your PR.